Thursday, February 5, 2015

Choo's Blood Orange Cocktails

I am so excited that blood oranges are in season. They have a beautiful deep color and are so deliciously sweet! I figured since I had blood oranges it would be fun to make cocktails with dinner. I used what I had in the house and came up with this yummy recipe. Hope you enjoy it as much as we did :)


The Players:
  • 1.5 cups of freshly squeezed blood orange juice
  • 1/4 cup of fresh lemon juice
  • 1.5 shots of vodka
  • 1/2 shot of blood orange liquor
  • 6-8 ice cubes

The Game Plan:

Place ice in a martini shaker and pour all of the above ingredients in there also. Shake and mix well. Pour into two glasses and enjoy!


Tuesday, January 13, 2015

One Pot Chicken Noodle Soup

Chicken noodle soup is probably one of my most favorite soups! I was craving something warm and comforting and it was perfect with the weather being so cold and rainy. It completely satisfied my craving and it was super easy clean up because it only required one pot! I know some of the best tasting chicken noodle soups are made with homemade stock but honestly with my husband being vegetarian, and it being so time consuming, this definitely did not make sense for me. But in no way did this chicken noodle soup disappoint!


Serves 4 fans

The Players:
  • 1 tsp extra virgin olive oil
  • 3 chicken tender or 1 chicken breast 
  • 1 small onions diced 
  • 1 carrot peeled and diced 
  • 1 celery diced 
  • 2 garlic cloves chopped small
  • 1 bay leaf
  • 4 springs of thyme, thyme leaves only 
  • 1 quart of low sodium chicken stock
  • 1/2 a chicken or veggie bouillon cube 
  • 1 cup of wide egg noodles
  • 3-4 tbs of finely chopped parsley
  • Salt 
  • Pepper


The Game Plan:

Place a medium sized pot on medium heat with olive oil in it. Meanwhile season the chicken with pepper on both sides. Place the chicken in the pot and cover. Let the chicken cook for about 4-5 minutes on each side. Once chicken is fully cooked take it out and let cool. Meanwhile place the carrots, celery, onions, garlic, thyme, and bay leaf in the pot and saute in the left over juices from the chicken for about 8-10 minutes or until the vegetables are soft. Meanwhile, shred the chicken with a fork and season with salt. Then add chicken stock and bring it to a simmer. Grate in the half bouillon cube. Add egg noodles and let cook for about 5-7 minutes, or until the noodles are cooked. Add in the chicken and parsley. Remove the bay leaf. Season with salt and pepper to your liking. Enjoy!

* The chicken was seasoned with salt after it had been cooked to keep the chicken as tender as possible. 

Friday, January 9, 2015

Roasted Parsnips and Carrots

I love roasting vegetables because it is so easy and the oven pretty much does all the work. I decided to use a combination of parsnips and multi-colored (purple, orange, and white) carrots with a few different fresh herbs. I made this recipe last night to compliment our dinner and it was not only delicious but very pretty due to the variety of colors.

Quick note on parsnips: Parsnips are root vegetables that are very similar to carrots but they are a little sweeter in flavor. You will usually see them at the grocery store more often during the cooler months.


Serves 2 fans 

The Players:

  • 3 Carrots sliced length wise about one inch thick
  • 2 Parsnips sliced length wise about one inch thick
  • 4 Tbs parsley chopped coarsely 
  • 1 Tsp thyme leaves, stems removed
  • 2 Tsp rosemary leaves chopped,stems removed 
  • 1 Tbs extra virgin olive oil
  • A few pinches of salt
  • A few pinches of pepper

The Game Plan:

Preheat the oven to 425 degrees. Place the carrots and the parsnips on a baking tray. Cover with olive oil, salt, and pepper and toss evenly to coat. Make sure the vegetables are spread apart and not too crowded. Then place in the oven once it has preheated. Let the vegetables roast for about 20 minutes. Take the tray out and turn the vegetables and then sprinkle the herbs on them. Place in the oven for about another 10-15 minutes or until slightly browned and crispy at the edges. Enjoy!


Thursday, January 8, 2015

Chilaquiles

Happy New Year!

I know I have not blogged in months but the end of the year always gets so busy! Most of the recipes from now on will probably only have the final picture with the recipe to make it easier for me. Taking pictures with each step really increases the time it takes me to cook and blog. I am hoping this will allow me to post more often :) So here is my first recipe with only the final picture.

Chilaquiles is typically made to use up leftovers and that is why it was perfect for me to make yesterday. Plus my husband loves chips and salsa and this is pretty similar considering it has a spicy sauce and crunchy tortillas chips. And the best part is that it is a nice warm dish to enjoy on a cold day like yesterday.


Serves 4 fans

The Players:

Tortilla Chips

  • 4 tortillas
  • Extra virgin olive oil
  • Salt
  • Taco Seasoning
Sauce

  • 1 can of whole peeled plum tomatoes 
  • 3-4 chipotle peppers 
  • 1 large onion diced
  • 5 garlic cloves minced
  • 1 cup of soy chorizo
  • 1/4 cup chopped cilantro plus more for garnish
  • Salt 
  • 4-8 Eggs
  • 3 green onion sprigs
  • Cotija cheese

The Game Plan:

Preheat oven to 350 degrees. Cut tortillas up into triangles. Place them on a baking pan and spread out evenly. Spray them with olive oil using something like a Misto. Then sprinkle some taco seasoning on the tortillas. Turn all of them over and repeat. Once oven is preheated, place the baking tray in the oven for about 10-12 minutes or until crispy.

*If you do not have an olive oil sprayer before cutting the tortillas up, brush them with olive oil on both sides and then cut them up into triangles. 

Place the whole can of tomatoes in a blender along with the chiptole peppers. Blend it together until it is a smooth sauce. Then taste it to see if you want more spice, if so add more chiptole peppers and re-blend. Taste again and add salt as needed.

Heat a large pan or pot to medium heat. Place all onions and let saute for about 10 minutes or until slightly browned. Then add garlic and let cook for another 2 minutes while stirring so the garlic does not burn. Place all sauce into a pan and also add chorizo. Let it all simmer while stirring occasionally until thickened. About 10 minutes. Add cilantro to the mixture. Taste to make sure it is all to your liking if not re-season. 

Make the eggs as you wish. We had them over easy and it was delish.

To assemble, place sauce in a bowl, place egg on top. Top with cotija cheese, cilantro, and green onions. Then place the tortillas on top. Smash the tortillas in the sauce and enjoy! 

*Another great addition would have been avocado, however we did not have any in the house :(


Tuesday, September 30, 2014

Basil Walnut Pesto

Pesto is one of the yummiest sauces ever! I love that it is so versatile and adds such a wonderful and fresh flavor to dishes. I use it to top pasta, eggs, crostinis, and much more. It is commonly made with pignolias (pine nuts) but I like to use what I have on hand, so I usually make mine with walnuts.

Most of the time I make a whole batch and if I am not going to use all of it for a few weeks I freeze it. When storing pesto in the refrigerator or freezer it is important to store it in an airtight container and cover it with olive oil so it does not oxidize. A great trick I have learned from Giada (food network chef) is to reserve starchy pasta water and mix in a little with the pesto when eating with pasta. This way you can use less olive oil to get it to the consistency you like.


The players:
  • 1/2 cup walnuts
  • 1/3 cup parm blocks =1/2 cup grated*
  • 1/2 tsp salt
  • Pepper to taste
  • 5 cups basil
  • 1/3 cup olive oil
  • 2-3 cloves of garlic


Place the walnuts and garlic in the food processor and pulse until it is coursley chopped.


Place the basil, salt, and pepper in and start adding oil and pulse.


Add all the oil and pulse until it is all pureed. If it needs more oil because it is not pureeing, add more. Add cheese and blend until incorporated. Taste it to make sure it is to your taste for salt and pepper. Enjoy!


* I use my food processor to grate the cheese to make it easier. Most food processors have a blade that will grate cheese. But if you don't have one or cannot find it like me, cut it up into small inch block, place it in the food processor and pulse until it is finely crumbled.


Tuesday, July 29, 2014

Red Pepper Sauce Huevos Rancheros

I was having friends over for brunch and was trying to figure out what to make. I knew that they liked Mexican and liked a good kick, so I decided to make heuvos rancheros. I have made huevos rancheros many times, but each time I have made it, it is a little different. Now, there is obviously faster versions of making this recipe but I felt like making it extra special by making the sauce from scratch. So warning, this recipe is not a super quick one and I would make it when you have a little more time. If you make the sauce ahead of time, this will be super easy to make.

This sauce recipe is my favorite! I originally used it for my enchiladas but now when I have left overs use it in my huevos rancheros also! It is so good and worth taking the time to make it. I usually use two types of dried peppers and ancho chilies are always one of the two. The other pepper, I have changed up quite a few times. When I make the sauce, I make a whole batch so I can freeze it and have it on hand. The sauce recipe below will make a ton of sauce, so just remember to make less if you don't want a ton of left overs.


Serves 4 fans

The Players:
  • 8 corn tortillas (if you prefer flour you can use those also)
  • Garlic infused canola oil*
  • 1 Avocado diced
  • Approx. 1/2 cup grated cotija Cheese
  • 8 eggs
  • Garnish: green onions and cilantro
  • 1 15 oz can of black beans
  • 1 package of veggie chorizo
  • 1 tsp of taco seasoning
  • 1/2 tsp of cumin


Red Chili Sauce:
  • 3 oz. of California Chilies
  • 8 oz. of Ancho Chilies
  • 4 cups of vegetable broth
  • 5-6 garlic cloves
  • Handful of cilantro
  • 2 tsp of ground cumin
  • 1/2 cups of adobo chiptole sauce and 2-3 chiptole chilies with some sauce that it comes in
  • Salt and pepper to taste
  • 2 cups of water

The Game Plan:

For the sauce:

Add broth to a medium to large pot. Place all the dried chili's in the broth and let soak for 10 minutes.


Then place the pot on the stove and heat it on medium low for 10 more minutes. 


 Place all ingredients into blender and blend till you get a nice sauce. Taste to see if you need more adobe sauce and/or chiptole chili's. 


Everyone's spice level is different. Recheck and add more salt if needed. If sauce is too thick, add more stock or water to make a smoother sauce.


For the tortillas:

Preheat oven to  400 degrees. Take the corn tortillas and brush them with the oil and place them on a baking sheet. 


Once oven is preheated, place in the oven. They don't take very long so keep an eye on them. About 6-8 minutes. Every oven is different but you are looking for the tortillas to be slightly golden and crispy.


For the beans and "meat":

Heat a medium sauce pan to medium heat and add 1 tsp of olive oil and then add chorizo. Cook for about 3-4 minutes. Add black beans, cumin, and seasoning. Once the bean mixture is heated through, adjust seasonings to your taste.


For the eggs:

Make them to your liking: Scrambled, fried, poached.

Now all you do is place the tortilla on a plate with the bean mixture on top, sauce, then the egg with some more sauce on that. Add the avocado, cotija cheese and garnish with green onions and cilantro!


Enjoy!

* I had made garlic infused oil but you do not need to use this at all. You can use olive oil or canola oil and it will still taste delish!

Thursday, July 24, 2014

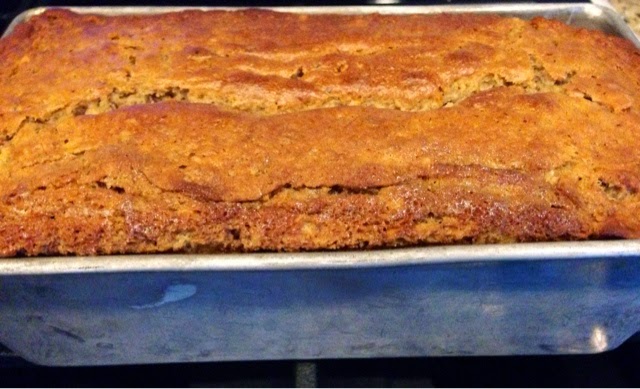
Banana Nut Bread

My mom's best friend makes the best banana bread and it always satisfies my sweet craving. When my husband and I first started dating, he would request it frequently. I never had a problem with making it because it was super easy to make and it always turned out great!

I decided to make it today because tomorrow is our physical therapy student's last day at work. I figured it would be a nice treat and a thank you for her hard work. Also, if you are ever looking for a reason to use up ripe bananas this is a great way. When I do not eat my bananas on time and they are super ripe, I stick them in the freezer and save them for making this recipe.

I did make some adjustments from the original recipe to make it perfect for my taste. I halved the amount of sugar from the original recipe, added cinnamon, increased the amount of vanilla, and occasionally add chocolate for fun! I hope you enjoy this delicious and moist banana nut bread as much as we do!


Yields: One loaf

The Players:
  • 3/4 cup vegetable or canola oil
  • 2 eggs
  • 3/4 cup sugar (if you want the bread sweeter you can add more sugar)
  • 1 overflowing tsp of vanilla
  • 1 tsp of cinnamon
  • 2 cups of self rising flour
  • 4 smashed very ripe bananas (if using frozen bananas, make sure they are fully thawed)
  • 1 tsp baking soda
  • 4 tbs buttermilk or 4 tbs of the watery part of yogurt
  • 3/4 cup walnuts
  • 1/2 cup of chocolate chips (optional)


The Game Plan:

Preheat oven to 325 degrees. Using a mixer, mix up the oil, eggs, sugar, and vanilla.


Note the color of the egg on the right side. Now that is farm fresh!

Once mixed well add the rest of the ingredients and mix all up until smooth. Do not over mix! 


Place in a greased loaf pan (8 1/2" x 4 1/2" x 2 3/4" high). Also, if for some reason this makes more batter than what you loaf pan will hold, do not fill it all the way to the top. You need to leave room at least an inch of room at the top. Otherwise, it will overflow and leave you with a mess! Either toss the extra batter or use it to make mini banana breads or muffins.


Place in oven for one hour and 15 minutes. Poke with a tooth pick in the middle to make sure it is cooked all the way through. Every oven is slightly different, so check on your banana bread after 50 minutes frequently to make sure it does not over bake. Once done, take the banana bread out and let cool completely before taking out of the pan. Enjoy!